8.自動テスト
学習目標
- 自動テストの利点とテストピラミッドを説明できる
- AAA に沿って、JUnit と AssertJ でテストを書き、例外を検証できる
- インターフェイスと InMemory(または Mockito)で依存を差し替え、データベースなしに Service をユニットテストできる
- Controller のテスト(MockMvc)とインテグレーションテスト(@SpringBootTest)を使い分けられる
- カバレッジの限界を説明できる
テスト で、投票機能のテストケースを設計し、手動で確認するテスト仕様書を作りました。本章では、Q&A サイトの投票を題材に、設計したケースを JUnit と AssertJ でコードにして自動で実行できるようにし、Service のユニットテストから Controller・インテグレーションのテストまで実装します。
1. 自動テストの準備
Section titled “1. 自動テストの準備”1-1. 自動テストとテストピラミッド
Section titled “1-1. 自動テストとテストピラミッド”手動テスト は、変更のたびに人が操作し直す必要があり、機能が増えると追いつかなくなります。確認の手順をコードに書いておけば、コマンド一つで何度でも実行でき、変更で動作が壊れてもすぐに気づけます。これが 自動テスト です。設計したテストケースを、そのままコードにします。
自動テストは、対象の広さで 3 段に分かれます。1 つのクラスやメソッドを対象にする ユニットテスト、複数の部品の連携を対象にする インテグレーションテスト、ブラウザー操作でアプリ全体を対象にする E2E テスト です。ユニットとインテグレーションは テスト のレベルと同じで、E2E はシステムテストにあたります。
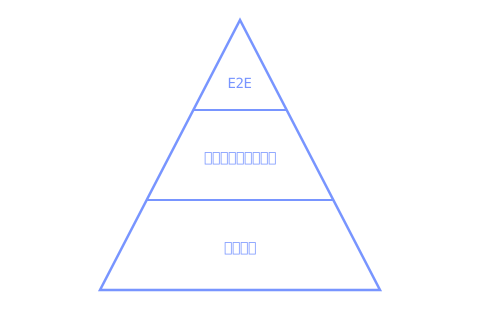
下の段ほど対象が狭く、速く実行できるため数多く書きます。上の段ほど対象が広く、起動する範囲が増えて遅くなるため、数を絞ります。この配分を テストピラミッド と呼びます。ビジネスルールは、おもに土台のユニットテストで確かめます。
1-2. テストの配置と実行
Section titled “1-2. テストの配置と実行”テストの道具は、プロジェクトの準備 で入れた spring-boot-starter-test に含まれます。テストを実行する JUnit、結果を検証する AssertJ、依存を差し替える Mockito です。
テストコードは、本体の src/main/java とは別の src/test/java に置きます。パッケージは本体と同じにし、クラス名はテスト対象の名前に Test を付けます。
Directorysrc/
Directorymain/java/com/example/qa_app/
- VoteService.java
Directorytest/java/com/example/qa_app/
- VoteServiceTest.java
テストは、VS Code のテストクラスに表示される実行ボタンか、ターミナルの ./mvnw test で実行します。
./mvnw test成功したテストは緑、失敗したテストは赤で示されます。失敗時には、期待した値・実際の値・該当箇所が出力されます。件数が 1 であるべきところ 0 だったときは、次のように違いが示されます。
expected: 1 but was: 02. JUnit と AssertJ
Section titled “2. JUnit と AssertJ”2-1. テストの構造
Section titled “2-1. テストの構造”テストは、@Test を付けたメソッドとして書きます。メソッドの中は、準備(Arrange)・実行(Act)・検証(Assert)の 3 段階に分けます。準備で対象とデータを用意し、実行で対象のメソッドを呼び、検証で結果が期待どおりかを確かめます。この型を、Arrange・Act・Assert の頭文字をとって AAA と呼びます。
利用者を表す User には、投票できる評価かを返す canVote があり、評価が 15 以上のとき true を返します。これを確かめるテストです。
import org.junit.jupiter.api.Test;import static org.assertj.core.api.Assertions.assertThat;
class UserTest {  @Test  void 評価が15以上なら投票できる() {    // 準備    User user = new User(1L, 20);
    // 実行    boolean result = user.canVote();
    // 検証    assertThat(result).isTrue();  }}
@Test は org.junit.jupiter.api.Test、assertThat は AssertJ の静的メソッドで、それぞれ import と import static で取り込みます。テスト名には、確認する仕様を書きます。JUnit はメソッド名に日本語を使えます。複数のテストで同じ準備を繰り返すときは、@BeforeEach を付けたメソッドに準備を書くと、各テストの前に自動で呼ばれます。
2-2. AssertJ による検証
Section titled “2-2. AssertJ による検証”検証には、AssertJ の assertThat を使います。assertThat(実際の値) に続けて、期待する条件を書きます。
assertThat(実際の値).条件(期待値);主な条件は、次のとおりです。
| 書き方 | 検証する内容 |
|---|---|
isEqualTo(値) | 値が等しい |
isTrue() / isFalse() | 真/偽である |
isNull() / isNotNull() | null である/でない |
hasSize(n) | 要素数が n である |
contains(値) | 要素を含む |
assertThat(question.getTitle()).isEqualTo("ログインできない");assertThat(answers).hasSize(2);条件は、検証の対象(値・真偽・コレクションなど)に応じて選びます。
2-3. 例外の検証
Section titled “2-3. 例外の検証”禁止された操作が例外で拒否されることは、assertThatThrownBy で確かめます。
assertThatThrownBy(() -> 処理).isInstanceOf(例外クラス);() -> 処理 が検証する処理で、指定した例外を投げれば合格、投げなければ不合格になります。
assertThatThrownBy(() -> service.vote(answer, voter)) .isInstanceOf(IllegalArgumentException.class);3. Service のユニットテスト
Section titled “3. Service のユニットテスト”ビジネスルールを持つ Service は、ユニットテストの中心です。投票の VoteService をテストします。テストに使う User・Answer・Vote は、次のクラスです。
public class User {  private final Long id;  private final int reputation;   // 評価
  public User(Long id, int reputation) {    this.id = id;    this.reputation = reputation;  }
  public Long getId() {    return id;  }
// 評価が 15 以上なら投票できる public boolean canVote() { return reputation >= 15; }}public class Answer { private final Long id; private final Long authorId; // 回答者の id
public Answer(Long id, Long authorId) { this.id = id; this.authorId = authorId; }
public Long getId() { return id; }
public Long getAuthorId() { return authorId; }}public class Vote { private final Long answerId; // どの回答への投票か private final Long voterId; // 誰の投票か
public Vote(Long answerId, Long voterId) { this.answerId = answerId; this.voterId = voterId; }}import org.springframework.stereotype.Service;
@Servicepublic class VoteService { private final VoteRepository voteRepository;
public VoteService(VoteRepository voteRepository) { this.voteRepository = voteRepository; }
public void vote(Answer answer, User voter) { if (!voter.canVote()) { throw new IllegalStateException("投票するには評価が 15 以上必要です"); } if (answer.getAuthorId().equals(voter.getId())) { throw new IllegalArgumentException("自分の回答には投票できません"); } voteRepository.save(new Vote(answer.getId(), voter.getId())); }}3-1. 依存の差し替え
Section titled “3-1. 依存の差し替え”VoteService は、投票を保存する VoteRepository に依存します。本番の VoteRepository はデータベースに接続します。テストのたびにデータベースを用意するのは手間がかかり、実行も遅くなります。
インターフェイスと DI で見たように、VoteRepository をインターフェイスにして実装を分ければ、テストではデータベースを使わない実装に差し替えられます。メモリ上のリストに保存する InMemoryVoteRepository を、テスト用に用意します。
public interface VoteRepository { void save(Vote vote);}import java.util.ArrayList;import java.util.List;
public class InMemoryVoteRepository implements VoteRepository { private final List<Vote> votes = new ArrayList<>();
@Override public void save(Vote vote) { votes.add(vote); }
public int count() { return votes.size(); }}count は、保存された投票の件数を返すメソッドで、投票が保存されたかの確認に使います。
3-2. ビジネスルールのテスト
Section titled “3-2. ビジネスルールのテスト”テストケースの確定 で設計した 4 つのケースを、JUnit のテストにします。各ケースが、1 つのテストメソッドになります。VoteService の組み立ては毎回同じなので、@BeforeEach にまとめます。
import org.junit.jupiter.api.BeforeEach;import org.junit.jupiter.api.Test;import static org.assertj.core.api.Assertions.assertThat;import static org.assertj.core.api.Assertions.assertThatThrownBy;
class VoteServiceTest {  private InMemoryVoteRepository repository;  private VoteService service;
  @BeforeEach  void setUp() {    repository = new InMemoryVoteRepository();    service = new VoteService(repository);  }
  @Test  void 評価が15以上なら他人の回答に投票できる() {    Answer answer = new Answer(1L, 100L);   // 回答者は id=100    User voter = new User(200L, 20);        // 投票者は id=200、評価 20
    service.vote(answer, voter);
    assertThat(repository.count()).isEqualTo(1);  }
  @Test  void 評価がちょうど15なら投票できる() {    Answer answer = new Answer(1L, 100L);    User voter = new User(200L, 15);
    service.vote(answer, voter);
    assertThat(repository.count()).isEqualTo(1);  }
  @Test  void 評価が15未満なら投票できない() {    Answer answer = new Answer(1L, 100L);    User voter = new User(200L, 14);
    assertThatThrownBy(() -> service.vote(answer, voter))        .isInstanceOf(IllegalStateException.class);  }
  @Test  void 自分の回答には投票できない() {    Answer answer = new Answer(1L, 100L);   // 回答者は id=100    User voter = new User(100L, 20);        // 投票者も id=100(本人)
    assertThatThrownBy(() -> service.vote(answer, voter))        .isInstanceOf(IllegalArgumentException.class);  }}
設計した 4 ケースが、4 つのテストに 1 対 1 で対応します。VoteService を new で組み立て、InMemoryVoteRepository を渡すため、このテストは Spring もデータベースも起動せず、短い時間で終わります。
3-3. Mockito
Section titled “3-3. Mockito”InMemoryVoteRepository は自分で書きました。実務では、依存の振る舞いをその場で指定する Mockito が広く使われます。Mockito も spring-boot-starter-test に含まれます。
import static org.mockito.Mockito.mock;import static org.mockito.Mockito.verify;import static org.mockito.ArgumentMatchers.any;
VoteRepository repository = mock(VoteRepository.class);VoteService service = new VoteService(repository);
service.vote(new Answer(1L, 100L), new User(200L, 20));
verify(repository).save(any(Vote.class));
mock(VoteRepository.class) は VoteRepository のモックを作り、verify(repository).save(any(Vote.class)) は save が呼ばれたことを検証します。戻り値が必要なときは、when(モックの呼び出し).thenReturn(値) で指定します。InMemory 実装を自分で書かずに、依存を差し替えられます。
4. レイヤーをまたぐテスト
Section titled “4. レイヤーをまたぐテスト”4-1. Controller のテスト
Section titled “4-1. Controller のテスト”Controller は、リクエストを受けてレスポンスを返します。ここでは、アプリの質問一覧画面を返す QuestionController を例にします。これは、GET /questions を受けると、id と title を持つ Question の一覧を QuestionService から取得し、ビュー名 questions を返します。検証には、@WebMvcTest で Web のレイヤーだけを起動し、MockMvc で擬似的なリクエストを送ります。
import org.junit.jupiter.api.Test;import org.springframework.beans.factory.annotation.Autowired;import org.springframework.boot.test.autoconfigure.web.servlet.WebMvcTest;import org.springframework.test.context.bean.override.mockito.MockitoBean;import org.springframework.test.web.servlet.MockMvc;import java.util.List;import static org.mockito.Mockito.when;import static org.springframework.test.web.servlet.request.MockMvcRequestBuilders.get;import static org.springframework.test.web.servlet.result.MockMvcResultMatchers.status;import static org.springframework.test.web.servlet.result.MockMvcResultMatchers.view;
@WebMvcTest(QuestionController.class)class QuestionControllerTest {  @Autowired  MockMvc mockMvc;
  @MockitoBean  QuestionService questionService;
  @Test  void 一覧画面が表示される() throws Exception {    when(questionService.findAll()).thenReturn(List.of(new Question(1L, "ログインできない")));
    mockMvc.perform(get("/questions"))        .andExpect(status().isOk())        .andExpect(view().name("questions"));  }}
@WebMvcTest(QuestionController.class) は、その Controller と Web のレイヤーだけを起動します。mockMvc.perform(get("/questions")) でリクエストを送り、andExpect でステータスやビュー名を検証します。Controller が依存する QuestionService は、@MockitoBean で Mockito のモックに置き換えます。
4-2. インテグレーションテスト
Section titled “4-2. インテグレーションテスト”複数のレイヤーやデータベースを含めて、アプリ全体の動作を確認するには、@SpringBootTest を使います。アプリと同じ設定で Spring を起動し、実際の依存をつないでテストします。
import org.junit.jupiter.api.Test;import org.springframework.beans.factory.annotation.Autowired;import org.springframework.boot.test.context.SpringBootTest;import static org.assertj.core.api.Assertions.assertThat;
@SpringBootTestclass QaAppApplicationTests {  @Autowired  VoteService voteService;
@Test void コンテキストが起動する() { assertThat(voteService).isNotNull(); }}@SpringBootTest は起動と実行に時間がかかるため、テストピラミッドのとおり数を絞ります。
4-3. カバレッジの限界
Section titled “4-3. カバレッジの限界”テストがコードのどの程度を実行したかの割合を カバレッジ(網羅率)と呼びます。カバレッジは確認の進み具合の目安になりますが、100% でも正しさは保証されません。すべての行を実行しても、境界値や異常系の検証が抜けていれば、不具合は見つかりません。カバレッジは目安として使い、テストケースの設計 で何を検証するかを優先します。